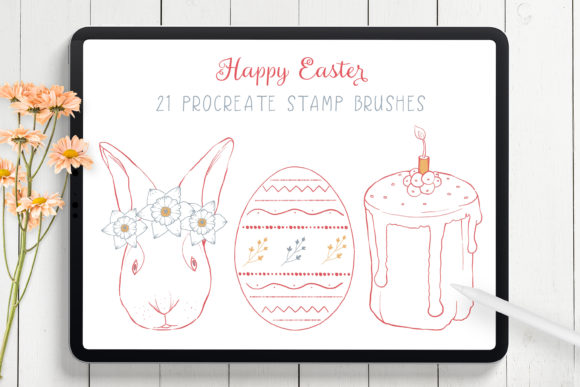
Mastering Your Spring Designs with Procreate Easter Bunny Brushes
Spring is a season of renewal, and for digital artists, it often means a surge in creative projects ranging from festive greeting cards to vibrant social media content. At the heart of many successful seasonal designs are specialized tools that save time while elevating quality. This is where Procreate Easter Bunny Brushes come into play. These digital assets are not just about drawing a cute rabbit; they represent a comprehensive toolkit designed to streamline your workflow. Whether you are a seasoned illustrator or a small business owner creating thank-you tags, understanding how to properly select and utilize these brushes can make the difference between a amateur-looking draft and a professional masterpiece.
The appeal of using dedicated Easter brush Procreate sets lies in their efficiency. Instead of spending hours sketching fur textures or manually placing egg patterns, you can tap once to place a perfectly rendered stamp. However, many creators overlook the nuances of integrating these tools effectively. A common misconception is that downloading a brush set guarantees instant artistic success. In reality, the quality of your final output depends heavily on how you configure and apply these stamps within your specific canvas settings. Ignoring resolution scales or opacity settings can lead to pixelated images or overcrowded compositions that feel cluttered rather than charming.
Avoiding Common Pitfalls in Digital Stamp Usage
One of the most frequent mistakes beginners make when working with Procreate brushes bunny collections is failing to check the compatibility and scale before starting a project. While these stamps are incredibly easy to use—simply download the .brushset file, import it, and tap your screen—the context matters. If you are designing a large-format poster but your brush settings are optimized for a small sticker, your Easter egg stamps may appear blurry or lose definition when resized too aggressively. Unlike vector graphics, raster brushes have a maximum effective size. Stretching them beyond their intended limit degrades the image quality, resulting in a fuzzy appearance that undermines the professionalism of your work.
To avoid this, always test your stamp on a duplicate layer at the actual size you intend to print or publish. Another overlooked detail is the color management of these brushes. Many users assume that because a brush comes in a specific color, it cannot be changed. This is incorrect. One of the greatest strengths of these tools is their flexibility; you can change the color, opacity, and even the underlying texture settings. A failure to utilize the color adjustment features often leads to artwork that looks disjointed, with elements that do not harmonize with the overall palette. By taking a moment to adjust the hue and saturation to match your specific theme, you ensure a cohesive look across your digital planner or greeting card.
Maximizing Versatility Beyond Simple Illustrations
It is easy to pigeonhole Procreate Easter Bunny Brushes as tools solely for drawing cartoons, but this limits their potential value. Entrepreneurs and marketers often miss the opportunity to use these assets for branding materials. For instance, the included Easter brush Procreate patterns can serve as subtle backgrounds for email headers, website banners, or packaging designs. The mistake here is treating the brushes only as foreground elements. When used as textural overlays with reduced opacity, these patterns add depth and a handmade feel to corporate communications without overpowering the message.
Furthermore, educators and bloggers frequently underestimate the power of these tools in creating engaging visual aids. A common error is overusing the stamps, placing too many bunnies or eggs on a single page, which creates visual noise. The better approach is restraint. Use the Easter egg stamps as accent points to guide the viewer's eye or to break up blocks of text in a digital planner. This strategic placement enhances readability and keeps the design clean. Remember, the goal is to support your content, not distract from it. By viewing these brushes as modular components rather than the entire solution, you can build more sophisticated and balanced layouts.
Technical Considerations for Optimal Results
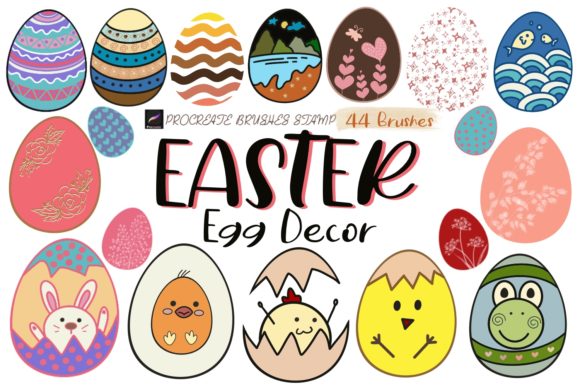
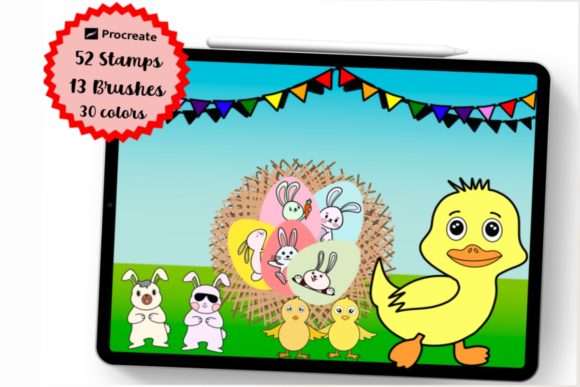
Before committing to a purchase or diving into a new project, there are practical checks you should perform. First, verify the file format. Ensure you are receiving a .brushset file, which is compatible with Procreate only. Trying to import these into other software will result in frustration and wasted time. Once imported, take advantage of the ability to resize and modify the stamps. The package typically includes a substantial variety, such as 52 distinct Easter stamps and 13 pattern brushes, along with a curated 30-color palette. Ignoring the included palette is a missed opportunity; these colors are often pre-selected by professionals to ensure they work well together, saving you the trial and error of color theory.
Another critical aspect is organization. When you download the zip file, it often includes presentation images to guide you. Many users delete these immediately, losing valuable references on how the brushes behave under different pressures or angles. Keep these guides handy. They serve as a quick tutorial on achieving specific effects, such as varying the density of a fur texture or the scatter of an egg pattern. Additionally, consider your end-use case. If you are creating stickers for physical printing, ensure your canvas DPI is set high enough (usually 300 DPI) before applying the brushes. Applying low-resolution stamps to a high-resolution canvas later cannot recover lost detail.
- Check Resolution Early: Always set your canvas dimensions and DPI before importing brushes to prevent pixelation.
- Utilize Layer Opacity: Don't rely solely on the default brush opacity; adjust layer transparency for softer, more integrated looks.
- Leverage the Color Palette: Use the provided 30-color set to maintain harmony, but feel free to create custom swatches for specific brand needs.
- Test Print Sizes: If making physical goods like tags or cards, print a test sheet to verify clarity and color accuracy.
In conclusion, integrating Procreate Easter Bunny Brushes into your workflow offers a fantastic way to enhance productivity and creativity during the spring season. However, the key to success lies in mindful application. By avoiding the traps of improper scaling, neglecting color customization, and over-cluttering designs, you can produce work that stands out. Whether you are crafting a heartfelt thank-you tag, designing a complex digital planner, or marketing a seasonal product, these tools provide the foundation for beautiful results. Take the time to understand the mechanics of the brushes, respect the technical limitations of raster graphics, and experiment with the diverse patterns available. With a balanced approach and a bit of practice, you will find that building your ideas has never been easier or more enjoyable.